These pictures are going to be more of the leather work process. This first picture shows a shoulder of hide or what is left over from everything else I've cut off. This "project" is going to be Mike's baldric. It will go from the right shoulder down to his waist on the left side. Basically when the sword is hung from his left side (because he is right handed) the weight will be distributed around his waist and also on his shoulder.
This one shows the same piece of leather with the main pieces cut out. What I am using to cut the leather with is called a strap cutter. It is so named because that is what it does. It cuts straps. There is a razor that cuts the leather on the adjustable arm. and the handle just makes it so you can pull the whole thing. It has measurements on it so you know exactly how wide you are cutting the leather. The reason I use this tool is because it allows me to keep a uniformity in the width of the leather.
Here Mike is modeling the pieces for us! The two shorter thicker pieces are going to be cut to size that drape from the shoulder down to the waist. The longer skinnier piece is the belt that wraps around the waist. Mike is just holding the pieces in place so I can take some measurements. After the measurements are taken we can move on to the next step of cutting them out and getting the holes punched. These are just straps and we aren't sure of the exact lengths we need for it to be finished yet.
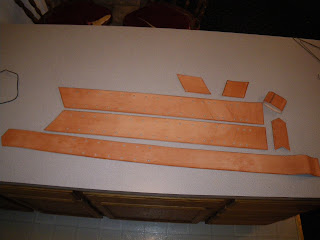
Here they are with the holes punched and a few other pieces that were taken from left over scraps. We determined that with what we wanted to do and available materials we would need these couple extra pieces to turn out what would become the finished product. The loop would be in essence a big belt loop. We would affix two D-rings for the waist belt and the excess would need to loop back into something. The two diamond shaped pieces would be lashed to the shoulder straps down where the belt would be so that the belt could go through them and secure the whole thing together. The idea is that basically everything could be tied together to make it more multipurpose and change for a different wearer or purpose. and the long arrow looking piece would be the shoulder cap. We would rivet the two shoulder pieces together at that point.
The holes up and down the baldric would allow for different items to be attached. Utility items or patches symbolizing conquered enemies or great achievements. It takes some planning and also some practice pieces to figure out what you want. Mike, David and I all talked and planned and schemed over how to do everything just right to maximize use as well as make a visually impressive item. We found that the more simple design with a few fancy additions was the key to get what we wanted.
It takes some space and some work to turn out a piece like this. Here are just some of the tools needed to turn out something like Mike's baldric. One of the utility items he used was a knife. To keep with the patches on the baldric this sheath was built for the dagger so it would all match. The larger mallet was to set the eyelets and the smaller one was used to pound in the designs on the leather. There are a few cutting tools and shaping tools and the pounding pad and sturdy rock foundation. Since the sheath was going to be sewn together you can also see another sewn sheath to just see how it's been done before. Learn from the past and improve the future!
=D
Wednesday, June 9, 2010
Wednesday, May 19, 2010
Sneaky, Sneaky!
If you notice the time stamp it is day time. Is today my day off? No. It happens to be a beautiful day outside and a beautiful day inside. At my day job I have some downtime. Wow! I mostly wanted to see if I could do this. Sure enough, it worked because you are reading this! I started out today on a good note. My brother joined me in battle for a short bought to route out evil. I started the day here and it has continued to be a great one.
Last night I went to a fellow co-worker's house for a game night. We played Shadows over Camelot, Hearts and another game that I forgot the name of but it was easy and fun. I won the second round. I also won the game of Hearts. I shot the moon once! Roger may have but there was some confusion and miscalculation or dealt cards. Unfortunately we threw that round out because it wasn't determined exactly what would have occured because it was close. I was also introduced into the work of Mystery Science Theater 3000. I laughed my keister off until 1:30 in the morning. We watched the Wolf-man one. It's been a great day! Cheers to all!
Sunday, May 9, 2010
Small Hobbies
For a while now, a little over two years, I've journeyed into the world of leather work. I have a small collection of weapons. I have decided to make some armor to join in the collection. This is the first of a string of posts that will be centered around some of the work that has been done.
This first picture is one of David priming for some silver paint that will adorn the ornate handle of this rapier that he made. Later pictures will show the scabbard that will be made for it. David has been making swords for a few years now. We both share a similar interest in arms and armor.
This is a picture of one of my first pieces I ever made. This helmet is a testament to my "learn-as-you-go approach." It is very large. I believe it more a learn how to stitch project more than a helmet but I still aim to see what I can do with it. I learned some concepts and then was sent to work. I have improved as I moved along. Mostly learning from what I did but always eager to learn from other sources my progress improves.
More to come. I only had a couple shots downloaded to my computer but you may see some stuff that you like. I had fun creating it.
Sunday, February 7, 2010
Discipline or Training?
Experiencing tear gas is like getting the chicken pox: It is something you should experience once in your life. So is being on the receiving end of a Tazer!
If you wonder how it feels just watch the video again. I answer any questions. =D
Subscribe to:
Posts (Atom)